 Save to Pinterest
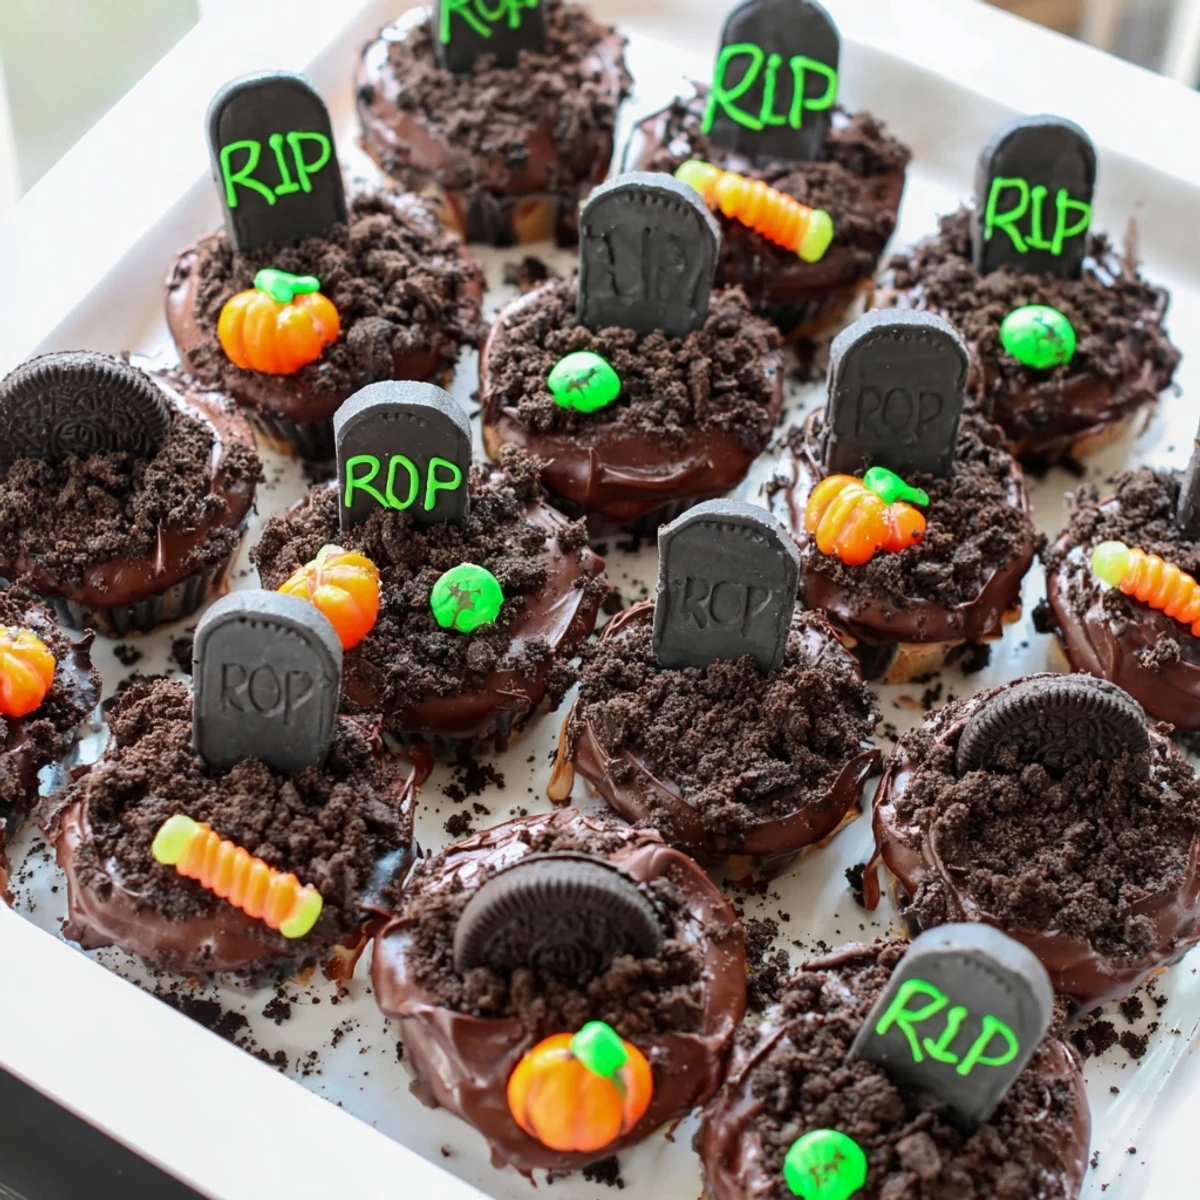
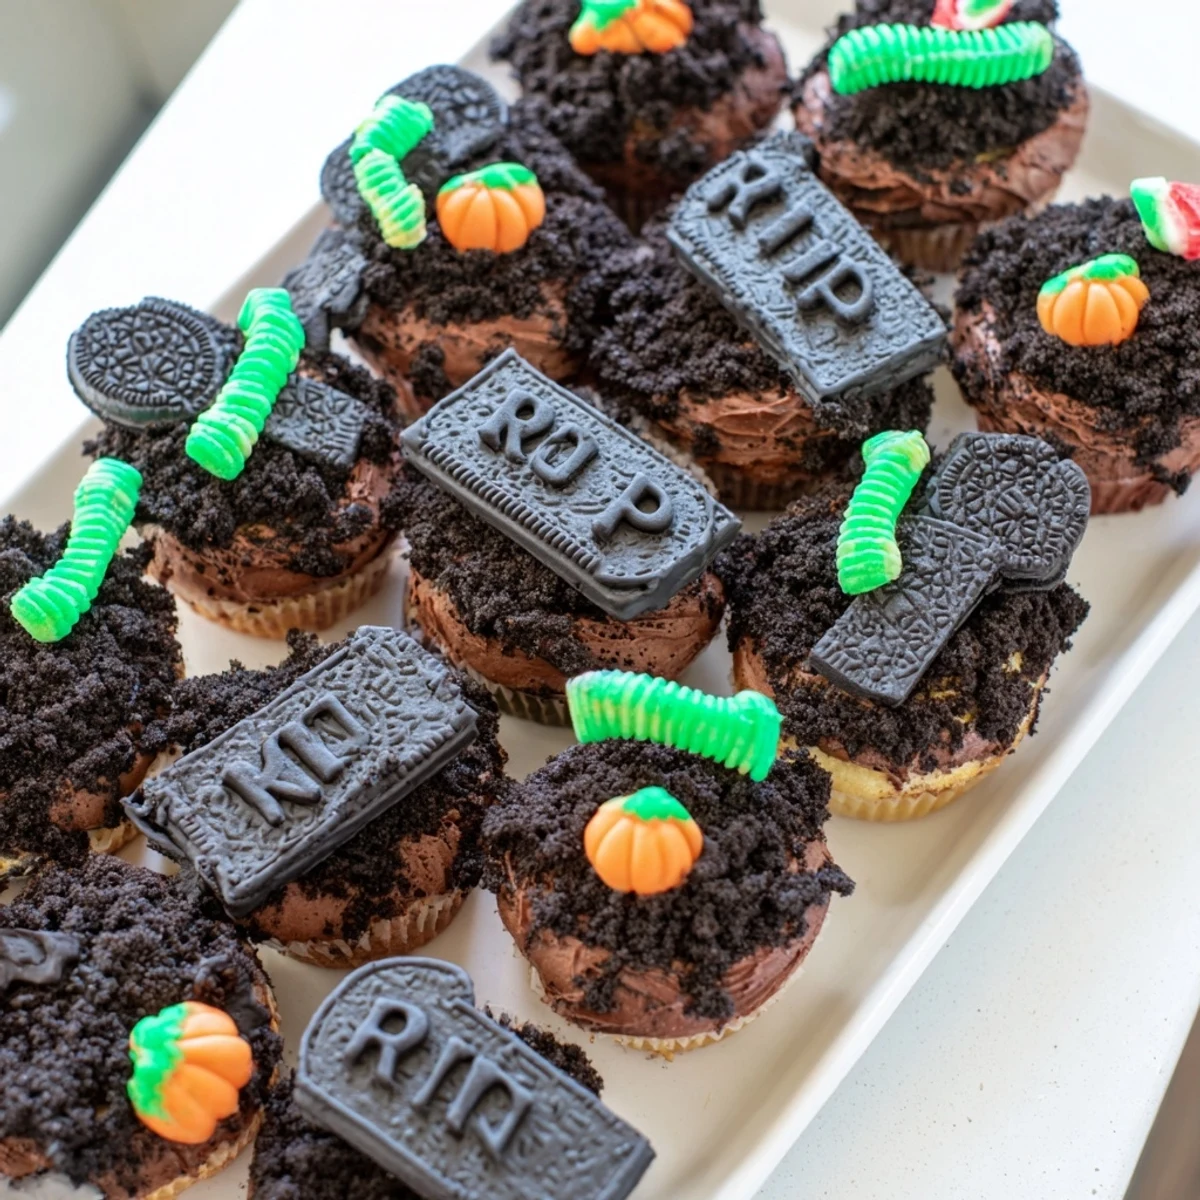
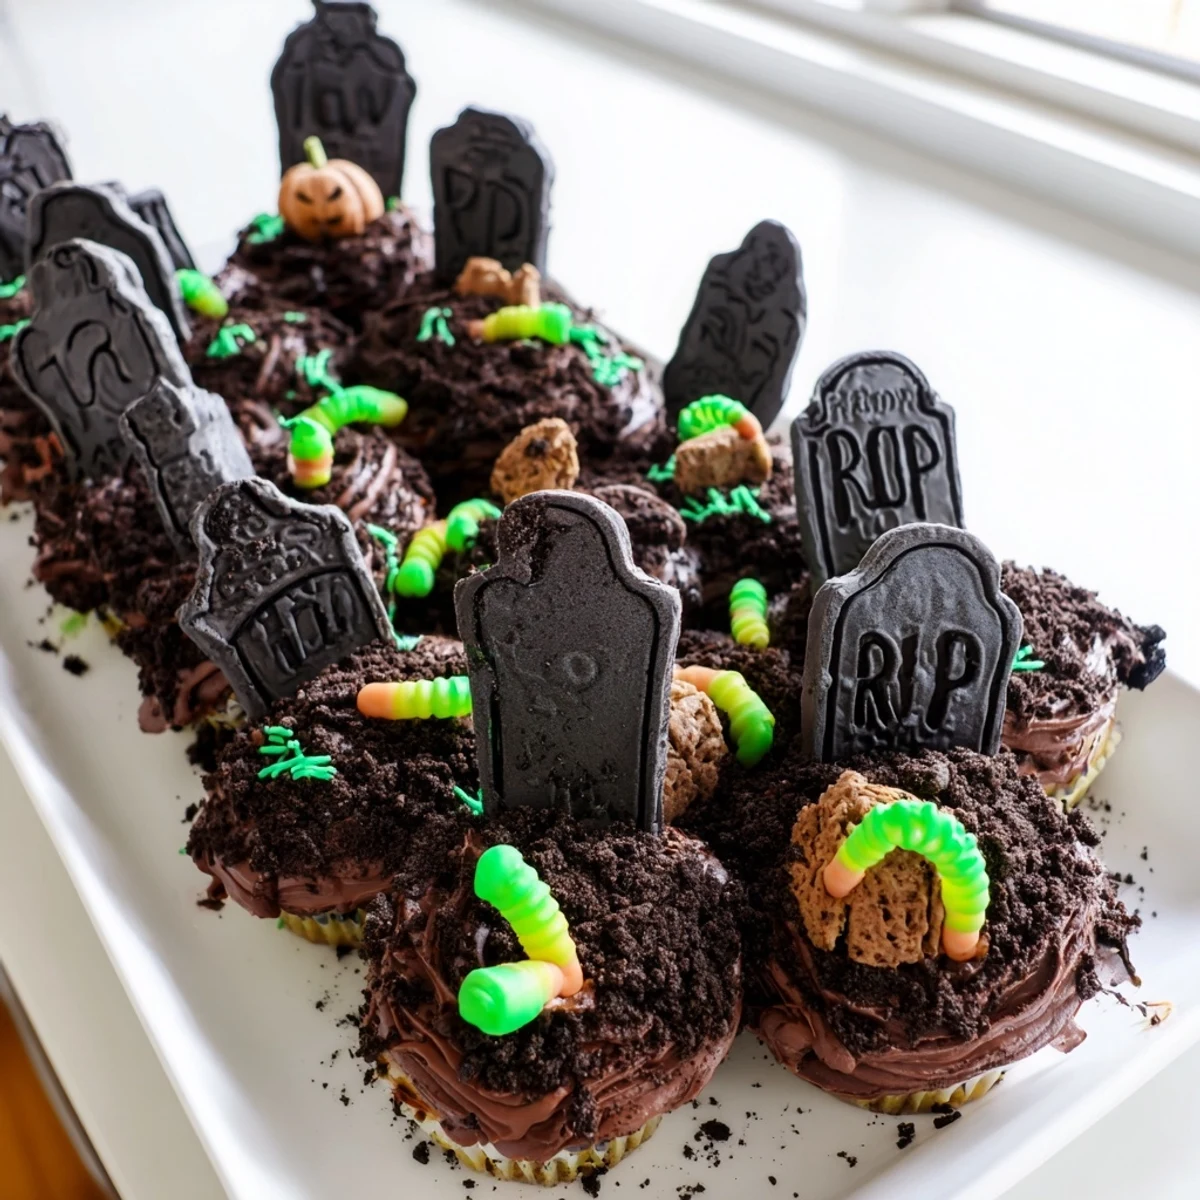
 Create a spooky Halloween centerpiece with these chocolate cupcakes assembled into a graveyard scene. The moist chocolate base is topped with rich chocolate frosting, crushed cookie "dirt," and edible tombstones made from rectangular cookies decorated with gel icing. Gummy worms and candy pumpkins add the final creepy touch.
This interactive dessert takes about 50 minutes from start to finish and is perfect for Halloween parties. Kids can help decorate the tombstones and arrange the graveyard toppings, making it a fun family activity. The pull-apart format makes serving easy, and the combination of chocolate cake, creamy frosting, and crunchy cookie texture delivers on both visual appeal and taste.
Customize with your favorite Halloween candies or make it gluten-free with simple substitutions. The chocolate frosting can be enhanced with instant coffee for a mocha variation, giving you flexibility while maintaining the graveyard theme.
The year my youngest turned eight, she announced her birthday party would have a proper graveyard theme and I fully committed to the bit. We spent three hours crushing Oreos on a Tuesday night while she designed tombstone messages, and the look on her friends' faces when I brought out this graveyard cake was absolutely worth the crumbs in every corner of my kitchen. Now it's become our October tradition, something we start planning as soon as the first pumpkin appears on doorsteps.
Last Halloween, my neighbor popped over just as I was arranging the tombstones and ended up staying an hour to help position gummy worms in particularly dramatic poses. We had frosting on our elbows and were laughing so hard at our RIP puns that her husband came over to see what the commotion was about. That's the thing about this cake, it turns dessert into an activity and an activity into a memory.
Ingredients
- 1 ½ cups all-purpose flour (180 g): The foundation that holds everything together, though I've learned measuring by weight rather than volume makes these noticeably more tender
- 1 cup granulated sugar (200 g): Creates that tender crumb structure we want, and creaming it properly with butter is what makes these cupcakes melt in your mouth
- ½ cup unsalted butter, softened (115 g): Room temperature is non negotiable here, cold butter creates a dense cake and no one wants that at a graveyard party
- ½ cup whole milk (120 ml): Whole milk creates a richer cupcake, though I've used almond milk in a pinch and no one noticed the difference
- 2 large eggs: Also should be room temperature, they incorporate better and create a more uniform texture throughout the batter
- 2 tsp baking powder: Gives these their rise, and I always double check my baking powder is fresh because there's nothing sadder than flat cupcakes
- 1 tsp vanilla extract: Don't skimp on quality here, pure vanilla makes such a difference in the final flavor
- ¼ tsp salt: Just enough to balance the sweetness and enhance the chocolate flavor
- 1 cup unsalted butter, softened (230 g): For the frosting, and again temperature matters because cold butter creates those dreaded lumps
- 2 ½ cups powdered sugar (300 g): Sifted if you can manage it, though I'll admit I've skipped that step when running late and lived to tell the tale
- ½ cup unsweetened cocoa powder (40 g): The deeper and darker the cocoa, the more dramatic your graveyard dirt will look
- 2-3 tbsp milk: Start with 2 tablespoons and add more only if needed, runny frosting is the enemy of structural integrity
- 1 tsp vanilla extract: A second dose because chocolate and vanilla are best friends and should always appear together
- Pinch of salt: Cuts the sweetness of all that powdered sugar and makes the chocolate taste more chocolatey
- 6-8 chocolate sandwich cookies: The more irregular the crush, the more convincing your graveyard dirt will appear
- 6-8 rectangular cookies or biscuits: I've used everything from fancy biscuits to simple graham crackers, anything rectangular that stands up works
- Black, white, and green gel icing pens: Stock up because these somehow always run out at the worst possible moment
- Gummy worms, candy pumpkins, or Halloween themed candies: The grosser the gummy worm, the more delighted the children will be
Instructions
- Preheat your oven to 350°F (175°C) and line a 12-cup muffin tin with cupcake liners:
- This step seems so basic, but I've forgotten to preheat more times than I care to admit and ended up with sad, dense cupcakes that taught me the hard way that oven temperature matters
- Cream the butter and sugar until light and fluffy:
- Beat those together for at least 3 full minutes until the mixture practically turns white and doubles in volume, this is what creates that tender cake like texture instead of something dense and muffin like
- Add eggs one at a time, then vanilla:
- Let each egg fully incorporate before adding the next, and scrape down the bowl because the flour loves to hide at the bottom and create dry streaks
- Whisk flour, baking powder, and salt in a separate bowl:
- Combine these thoroughly so you don't end up with pockets of baking powder, which I once did and resulted in one cupcake that tasted like pure regret
- Add dry ingredients in thirds, alternating with milk:
- Start and end with the flour mixture, mixing only until just combined because over mixing at this stage creates tough cupcakes and no graveyard needs tough cupcakes
- Fill liners 2/3 full and bake for 18-20 minutes:
- An ice cream scoop is my secret weapon for even distribution, and rotate the pan halfway through because my oven has hot spots that have burned more than one batch
- Cool completely on a wire rack:
- This feels like the longest wait of your life, but frosting warm cupcakes creates melty disasters that I have personally witnessed and wish upon no one
- Beat butter until creamy for frosting:
- Give it a solid 2 minutes on its own first, breaking down the butter structure before adding anything else makes for the smoothest frosting
- Add powdered sugar and cocoa slowly:
- I put a kitchen towel over the mixer because that first puff of cocoa dust will coat everything within a five foot radius, including your phone and your face
- Add vanilla and milk until smooth:
- The texture should be spreadable but not soft, think peanut butter consistency, and remember you can always add more milk but you can't take it back
- Arrange cupcakes close together on a serving tray:
- They should touch each other because the magic of a pull apart cake is that it looks like one cake until people start pulling, and I always go for a rectangular graveyard shape
- Frost generously over all cupcakes as one surface:
- Don't worry too much about perfection because you're about to cover it all in dirt anyway, which is perhaps the most forgiving aspect of this entire recipe
- Crush cookies and sprinkle over frosting:
- Place them in a zip top bag and let kids go to town with a rolling pin, or use a food processor if you want a finer, more soil like dirt texture
- Write messages on rectangular cookies:
- Simple RIP works, but my daughter once wrote SEE YOU SOON on one and honestly that was both hilarious and slightly unsettling
- Press tombstones into cupcakes and add decorations:
- Arrange them at slightly different angles for that authentic neglected graveyard look, and position gummy worms as if they're emerging from their final resting places
- Chill briefly before serving:
- Just 15 minutes in the fridge helps everything set, though I've served them immediately and the only consequence was slightly listing tombstones
 Save to Pinterest
 These cupcakes have become my go to contribution for every school Halloween party and office potluck, mostly because they're the one thing that gets people to actually interact with their food instead of just eating. Something about pulling apart your own grave portion brings out the kid in everyone, and I've watched grown adults argue over who gets the tombstone with the spookiest message.
Making It Your Own
The beauty of this graveyard theme is how endlessly customizable it is. One year we made skeleton hands reaching out of the dirt using white chocolate melted and shaped into fingers, and another year we added candy corn fences around the perimeter. I've seen people use crushed vanilla wafers mixed with cocoa for lighter colored dirt, and green-tinted coconut makes spectacularly realistic grass patches between graves.
Working With Kids
This might be the most child-friendly dessert project I've ever encountered, mostly because the messier the execution, the more authentic the graveyard aesthetic. My kids have taken over the tombstone design entirely, creating little illustrations and puns that somehow make the whole thing even more delightful than I could have planned. The younger ones can crush cookies and place gummy worms while older kids handle the gel pens with surprising dedication.
Storage And Transport
These actually travel better than you might expect, especially if you assemble everything at the destination and transport the components separately. I've learned to bring extra frosting and a few spare cookies for touch ups because tombstones have a tendency to list sideways during transit. The unfrosted cupcakes keep beautifully in the freezer for up to a month, which means I can bake the base weeks in advance and just focus on the graveyard assembly when party day arrives.
- Set up an assembly station with all decorations in small bowls
- Keep the frosting at room temperature for easier spreading
- Have wet wipes nearby because chocolate and gel icing are remarkably stubborn
 Save to Pinterest
 There's something wonderfully subversive about a dessert that encourages playing with your food, and I've come to believe that's exactly why these graveyard cupcakes work so well at parties. They're not just sweet, they're an experience and a conversation starter and a tiny bit morbid in the most charming way possible.
Recipe FAQs
- → How far in advance can I make these graveyard cupcakes?
-
Prepare the cupcakes and chocolate frosting up to 2 days ahead. Store unfrosted cupcakes in an airtight container. Assemble and decorate on the day of serving for best results, though the fully assembled graveyard can be refrigerated overnight. Bring to room temperature before serving.
- → What cookies work best for the tombstones?
-
Rectangular biscuits like Milano cookies, digestive biscuits, or graham crackers work perfectly. Look for cookies that are sturdy enough to hold the icing writing without breaking. Chocolate wafers or vanilla sandwich cookies with cream removed are also excellent options.
- → Can I make these cupcakes gluten-free?
-
Yes, substitute the all-purpose flour with a 1-to-1 gluten-free flour blend. Ensure your baking powder is gluten-free and use gluten-free chocolate sandwich cookies and rectangular biscuits for the decorations. The taste and texture remain excellent.
- → How many people does this graveyard serve?
-
This makes 12 cupcakes arranged as a pull-apart graveyard, serving approximately 8-10 people. The visual presentation makes it perfect for parties where guests can each grab a cupcake from the arrangement. Adjust quantities by doubling the batch for larger gatherings.
- → What other Halloween decorations can I add?
-
Beyond gummy worms and candy pumpkins, consider candy bones, candy corn scattered as autumn leaves, skull-shaped candies, or edible glitter for a ghostly effect. Black and orange sprinkles, chocolate rocks, or marshmallow ghosts on toothpicks work wonderfully too.
- → Can I use boxed cake mix instead of from scratch?
-
Absolutely. Use your favorite chocolate cake mix prepared according to package directions. The homemade chocolate frosting and graveyard decorations are what really make this special, so starting with a mix saves time while still delivering impressive results.